Summary
This article explains the benefits of Google My Business for loan officers. Learn how to optimize your profile, improve search visibility, and attract local clients. Managing reviews and leveraging local SEO are key to building a strong online presence. By the end, you’ll know how to use this tool to enhance your digital marketing strategy.
If you are just considering getting your local SEO strategy together for your mortgage brokerage, your Google My Business listing is the first place you need to start. This is the directory held on google that allows your business to appear in local search results and when people search on Google Maps.
It essentially puts a beacon on your mortgage company on Google for people that are searching for your services locally. According to Search Engine Land, local searches lead 50% of mobile visitors to visit stores within one day. So you can see why it’s so important that information about your business shows up when people search Google.
You can check out our full guide on Local SEO For Mortgage Brokers & Loan Officers here.
This comprehensive guide will help you set up, verify and optimize your Google My Business account and get your Mortgage Business in the local search results.
STEP 1: Create A Google My Business Listing
The first thing you want to do is log into the Google Account you want associated with your business. If you don’t have a Google Account, you can create one to use for your GMB listing. Go to http://www.google.com/business and select the “Manage Now” button in the top right hand corner to get started. When the welcome screen pops up, click the “get started” button. From there, you can enter your business name.
Next you want to enter your business address.
- Once you’ve entered your address, you have the option to choose that you serve people outside your business location. Be sure to select that you do this, as it will let prospective clients know you are willing to come to them, if necessary.
- Lastly, you’ll want to select all the geographic areas you service. Be sure to list every city/area in this selection so you are optimizing your listing to its fullest potential.
Next you’ll want to choose your business category. This is what tells Google what type of searches should show your listing. You’ll see there are a few different selections available when it comes to mortgage. Choose the one that most closely represents your business.
Next you’ll want to enter in your brokerage’s contact information. Be sure to enter in both your company phone number as well as your website URL.
Lastly, you’ll want to click the “Finish” button. From there you’ll be taken to your control panel where you can verify your business and continue filling out and optimizing your profile.
STEP 2: Verifying Your Google My Business Listing
Before you can make your Google My Business listing public, you have to verify that you are in fact the owner of the business and authorized to promote the business online. There are several ways to verify your GMB listing:
- By postcard
- By phone
- By email
- By instant verification
Postcard Verification
In the Google My Business control panel, click the “verify my business” button. You’ll be taken to a window with your mailing address on it. Be sure to verify the address is correct, and also add your contact name. That’s who the postcard will be addressed to.
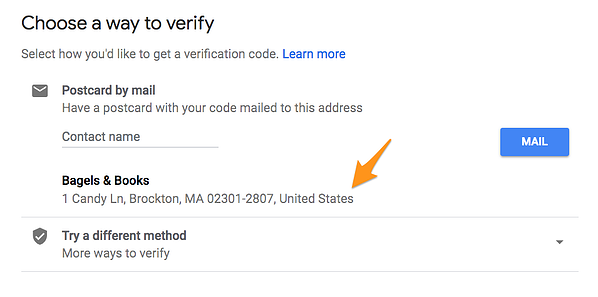
Next, simply click “Mail.” The postcard should reach you in roughly five days.
PRO TIP: Make sure you don’t edit your business name, address, or category (or request a new code) before your card arrives, because this could delay the verification process.
When the postcard arrives in your mailbox, log into Google My Business. If you have more than one business location, select the location you want to verify. If you only have one, select “Verify now.” In the Code field, enter the verification code that was printed on your postcard. Click “Submit.”
If your postcard never shows up, or you lose it, you can request a new code by signing into Google My Business and requesting one.
Phone verification
Some businesses are allowed by Google to verify their location by phone. If you’re eligible, you’ll see the “Verify by phone” option when you start the verification process.
Make sure your phone number is correct on the screen, then click “Verify by phone.” Enter the verification code from the text you receive.
Email verification
Google lets some businesses verify their location by email. If you’re eligible, you’ll see the “Verify by email” option when you start the verification process. When you choose this option, make sure your email address listed is correct, then choose “Verify by email.”
Go to your email inbox, open the email from Google My Business, and click the verification button in the email.
Instant verification
If you’ve already verified your business with Google Search Console (a tool that lets you manage your website’s search performance), you may be able to instantly verify your email. To do this, simply sign into Google My Business with the same account you used to verify your business with Google Search Console.
STEP 3: Optimizing Your Google My Business Listing For Your Mortgage Business
Once you’ve verified your mortgage business, it’s time to finish setting up the rest of your profile so you turn up in as many local searches as possible.
Go to the Google My Business dashboard, click the listing you’d like to work on, select “Info,” and then choose a section to fill out or update.
Add as much information as you can. You’ll want to include a profile photo for your business (this could be your logo or building for instance), the areas you serve (update them if you want to add more from the initial setup), your business hours, and even how long you’ve been in business.
Anyone can “suggest an edit” to your listing, so it’s important to make sure your listing is as accurate as possible the first time so people don’t try and make changes on your listing. You’ll also want to periodically log into your Google My Business dashboard to make sure all the details still look correct.
At any point in time, you can edit your business profile by logging into your Google My Business dashboard, clicking on “Info,” clicking the pencil next to the field you’d like to edit, making your change, and then choosing “Apply.”
Add Photos To Your Listing
According to Google, businesses with photos see 35% more clicks to their website and 42% higher requests for driving directions in Google Maps.
You’ll want to make sure your photos look their best, so make sure they are at least 720 pixels wide by 720 pixels high. You’ll want to upload them in a .jpg or .png format.
Here are some types of photos you’ll want to add:
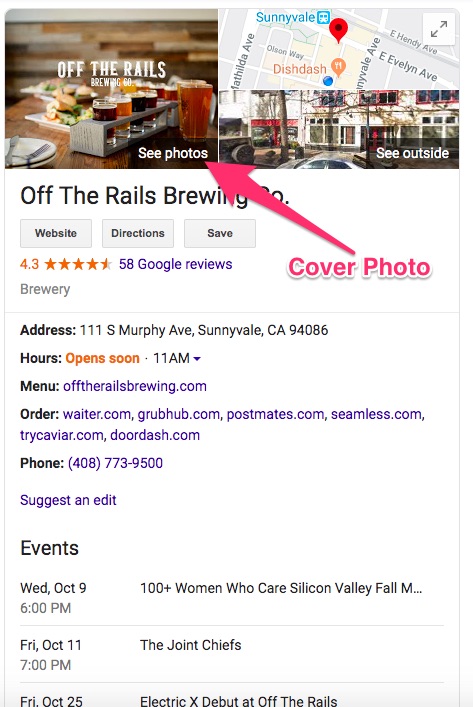
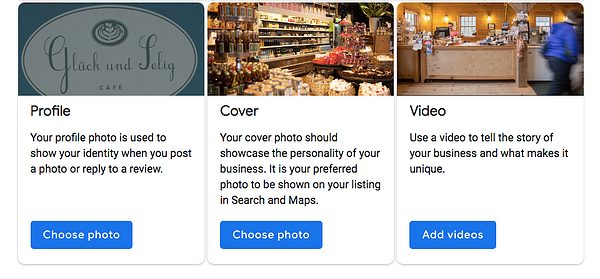
Cover photo
Your Google My Business cover photo is one of the most important, as it shows up front and center on your listing. For your mortgage business, if your building is very impressive, perhaps consider using that. Or, if you want to get more personal, get a group photo of your team and use that as your cover photo.
Profile photo
Your profile photo is what appears when you upload new photos, videos, or review responses.
Along with your profile and cover photos, you should also upload other pictures to make your listing more informative and engaging. For instance, perhaps you set up a new procedure where whenever you close a loan, take a photo of the new homeowner’s holding a “sold” rider sign. You can start a collection of them showing all the different homeowners you’ve helped with their home financing needs.
Add Video To Your Google My Business Listing
You can also add videos to your Google My Business listing for your mortgage company. There are some restrictions that you need to take into account.Videos must be:
- 30 seconds or shorter
- 100 MB or smaller
- 720p resolution or higher
One great idea you can use to attract more interest in your brokerage is using video to capture client reviews (on top of the written ones of course). Or, perhaps you can do a weekly, “state of the market” recap. Try different things and have fun with it. Monitor views and engagement and when you find something that is resonating with your audience, focus additional efforts on that theme.
Google My Business Reviews
It goes without saying that reviews are massively important to your mortgage company’s Google My Business Profile. Sometimes people find it hard to get them, but half the battle is asking for them. Once you start to get them rolling in, be sure to respond to them. Not only does leaving an appreciative response show the original reviewer you’re thankful for their support, it also makes that positive review stand out on your listing and can even influence others to leave their own reviews. This exercise will help you grow your reviews organically/virally.
Download The Google My Business App
It’s important to remember that the world of online is becoming increasingly an “on demand” world. This means that to stand out and get attention, you need to quickly respond to questions or reviews that come into your Google My Business profile. Luckily, as with everything, there is an app for that. Google My Business is available in app form for both iOS and Android.
Using the app you can manage things in your profile, such as updating business hours, locations, your contact information or your mortgage business description. You can also use it to post statuses, add additional photos and respond to reviews.
Take The Time To Set Up Your Google My Business Listing Now And Watch Your Mortgage Business Grow
Though this guide includes a pretty significant number of steps needed to set up, verify and optimize your mortgage brokerage’s Google My Business profile the setup process is actually pretty simple and straightforward. If your goal is to increase your local SEO traffic, this is a critical step that will pay you back quickly.
Key Takeaways
- Boost Local Visibility
Optimize your Google My Business profile to attract nearby clients.
- Leverage Customer Reviews
Manage and respond to reviews to build trust and credibility.
- Enhance SEO Performance
Use local SEO tactics to improve your ranking in search results.
Commonly Asked Questions
- Why is Google My Business important for mortgage professionals?
It boosts local visibility, ensuring your business shows up in relevant searches and attracts nearby clients.
- How can reviews on Google My Business impact your business?
Positive reviews enhance credibility and trust, encouraging more leads to choose your services.
- What is the benefit of optimizing your profile?
A fully optimized profile increases engagement, providing crucial details like services, hours, and contact info.
- What types of posts should you share on Google My Business?
Share updates about your services, market trends, or client success stories to stay relevant and engaging.


